Click2photon is a device for measuring the latency or delay between a physical action like a mouse click and an associated change of image on a screen. It primary purpose is to measure the inherent delay in the round trip processing of a VDI environment usually called latency. In essence it is measuring the time it takes for the client device to register the mouse click, send that information to a server over the network plus the time taken for the server to process the mouse click and send a new updated display to the client and the rendering of that new image by the client. Minimising this latency is the key to good VDI responsiveness and this unit provides a simple and effective way to make that measurement.
The unit comprises a small microcomputer with built in display and an optical sensor to detect changes in screen display together with a modified mouse with an extra cable which feeds the left click signal to the measurement unit.
The microcontroller detects the mouse click and then measures the delay before a screen window changes from black to white. The resulting delay is displayed on the built-in oled display together with minimum, average and maximum values. There will always be a range of values measured because of the variability of the delay in the processing chain thru the network and computer so using an average value may be appropriate in some scenarios and using a maximum value may be appropriate in others.
The unit looks like this.
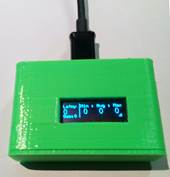 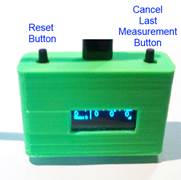 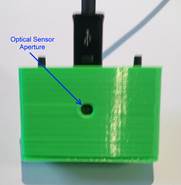
Face View Top View Back View
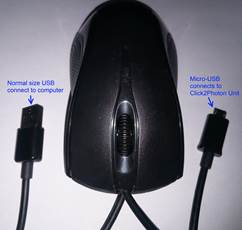
The unit is supplied with a modified mouse with two leads. The lead with the normal size USB plug is connected to the computer (if you have another mouse or a touchpad in the case of a laptop there is no problem in having both mice connected at the same time). The lead with the micro-USB plug is connected to the Click2Photon unit. This lead supplies power and the “click” signal to the unit.
A small Windows application (tested on Win 7 and Win 10) is supplied with the unit. This application displays a black window when started. When the left modified mouse button is clicked (cursor needs to be in the window) the window turns white. When the mouse is release the window turns black again ready for the next measurement.
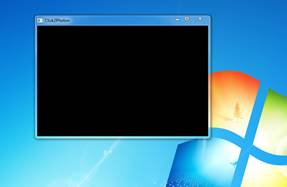 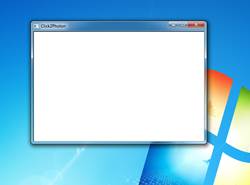
Click2photon App Left Mouse Up Click2photon App Left Mouse Down
Operation
With the unit powered up and the click2photon app running in your windows VDI session hold the back of the click2photon unit against the screen where the black windows is displayed and click the modified mouse left button. The window will turn white and a reading should be displayed (if not see below) and the minimum, average and maximum values should be updated. After taking a measurement the unit has a small processing time and indicates that it’s ready for the next measurement by displaying a small triangle in the lower right of the oled display. Measurements can be taken about once every second.
Note that measurements can also be made just with a standalone machine (no VDI). Just start the click2photon application directly on the machine (laptop, desktop etc) and proceed as above. A delay of 60-80ms of milliseconds will still be expected thru the processing stack even on a standalone machine due to the operation of the various drivers in recognising the mouse click and composing the screen change.
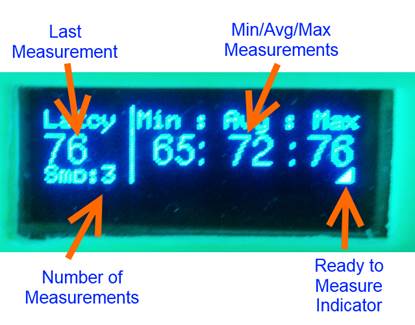
Note: During operation it is possible for a single measurement to be erroneous high, if the sensor is moved or detects light from some other source for example. For this reason the right hand button on the unit can be used to delete the last measurement. If a fresh set of measurements are required then the left button on the unit resets it to zero ready for new measurements.
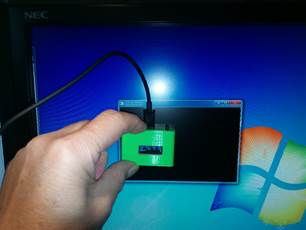
Making a measurement.
Possible Problems and Solutions
If the screenof the unit shows an incorrect display when powering on (speckles) rather than the splash screen then a power glitch has caused a problem. Simply remove and reapply power by unplugging either the micro-USB or the large USB and then plugin again after a couple of seconds. This should reset the device and show the splash screen.
If no reading is taken when the mouse is clicked and the screen window turns from black to white then it is likely that the screen is not bright enough. This can happen on laptops for example when running off battery because the backlight intensity is reduced to save power. Either increase the brightness of the display or power the laptop from the mains supply.
Some LCD monitors have a mode called Eco or Power Save, in this mode the monitor modulates/pulses the backlight to again save power. This modulation cannot be seen by the human eye due to persistence of vision but can be detected by the opto-sensor and this will cause false triggering or incorrect readings. To avoid this problem switch off the Eco mode of the monitor using its built-in menu.
|